This document will detail the steps to create an ODBC DSN to a remote Oracle TimesTen Database in Windows. The client machine has Oracle TimesTen 11g (11.2.1.6.1) Client install and the remote server has Oracle TimesTen 11g (11.2.1.6.1) Server installed. Both machines are running Windows.
For installation steps for the server see the post Install Oracle TimesTen In-Memory Database 11g (11.2.1.6.1) 32bit on Windows. For client install steps see the post Installing the Oracle TimesTen In-Memory Database 11g (11.2.1.6.1) Client on Windows.
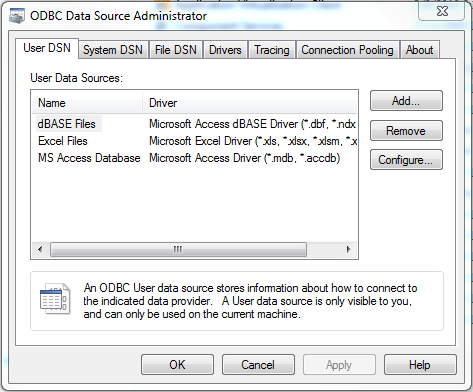
Start ODBC Data Source Administrator on the User DSN tab click the Add button.
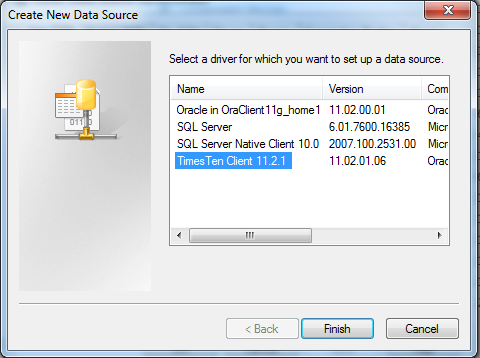
On the Create New Data Source dialog select the TimesTen Client 11.2.1 driver and click the Finish button.
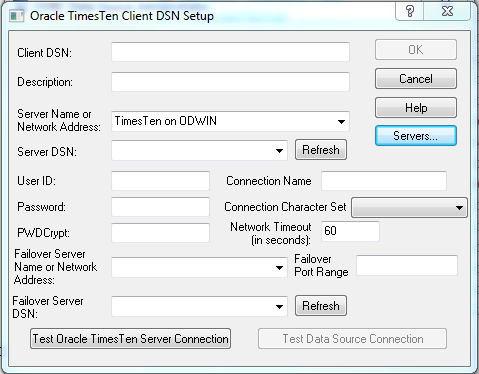
After selecting the TimesTen Client driver the Oracle TimesTen Client DSN Setup dialog will appear.
If you provided a Server Hostname in the Client DSN example setup during the client install you should see that the Server Name or Network Address field has value. If your TimesTen Server is running on the default TCP/IP port you can simply put the server name in Server Hostname and click the Test Oracle TimesTen Server Connection. You should see a dialog showing success. If you receive errors your Server may not be listening on the default port and you will need to configure a Logical Server Name. If your connection test succeeded you can skip next step Defining a Logical Server Name.
Defining a Logical Server Name
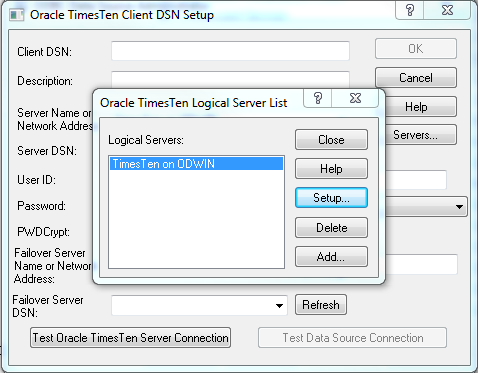
Click the Servers… button to go to the Servers list screen.
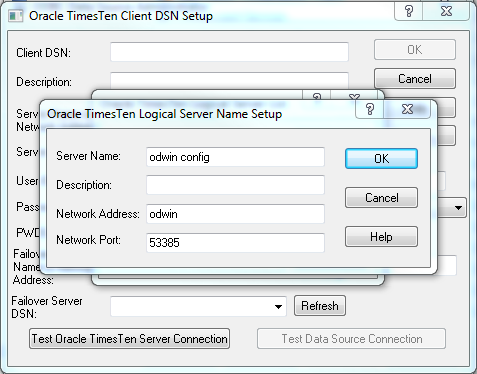
Click the Add… button to bring up the Oracle TimesTen Logical Server Name Setup dialog.
Provide a Sever Name, Network Address and Network Port. The Server Name field is a descriptive name for this Logical Server entry. The Network Address is either host name or the IP address of the server hosting the Oracle TimesTen Databases is configured. Network Port is the port number the in which the Oracle TimesTen Database is listening. Description can be left blank.
After entering your values click the OK button to go back to the Logical Server list. Select the logical server name you just configure and click the Close button.
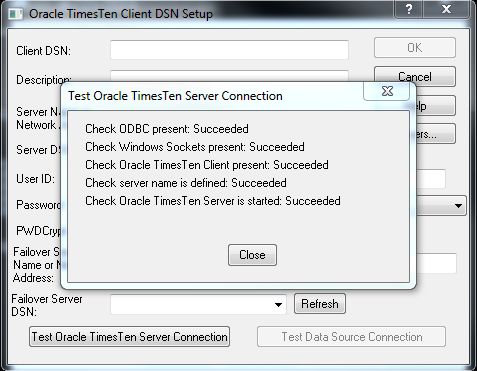
Now when you click the Test Oracle TimesTen Server Configuration button should show all test succeeded.
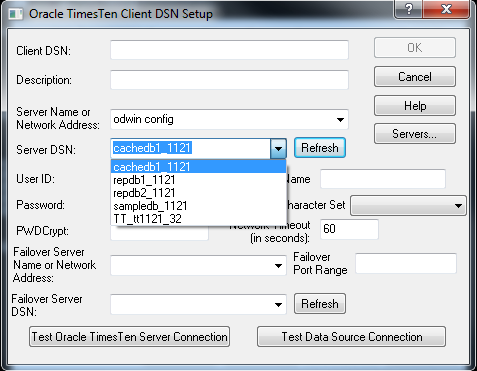
Click the Close button to close the test dialog. On the Oracle TimesTen Client DSN Setup dial click the Refresh button to populate the Server DSN drop down.
If the sample database where installed on your server you should see a list similar to that above. For this example we will use the Server DSN of sampledb_1121.
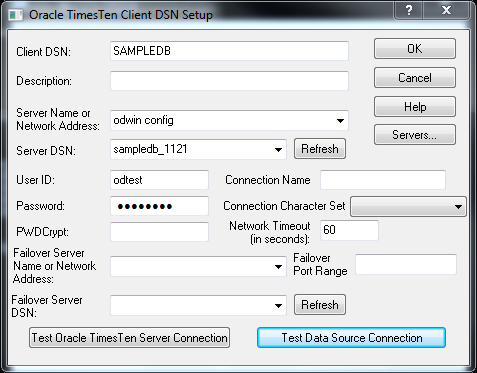
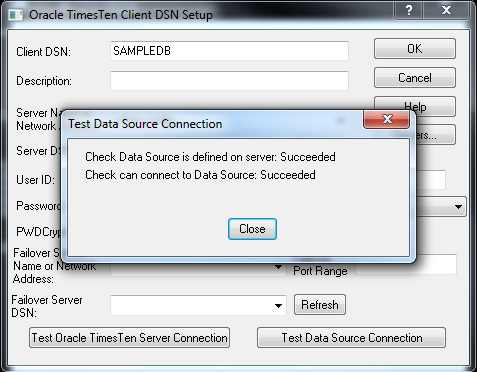
To finish out the DSN provide a Client DSN, a user id and password. Test the DSN by clicking the Test Data Source Connection button.
Click the Close button to close the test dialog. After the successful test the DSN is complete. Click the OK button on Oracle TimesTen Client DSN Setup to save the change.
From the command prompt you should now be able to connect to the database using ttIsql.
Microsoft Windows [Version 6.1.7600]
Copyright (c) 2009 Microsoft Corporation.  All rights reserved.

C:\Windows\System32>ttisql sampledb

Copyright (c) 1996-2010, Oracle.  All rights reserved.
Type ? or "help" for help, type "exit" to quit ttIsql.


connect "DSN=sampledb";
Connection successful: DSN=sampledb;TTC_SERVER=odwin config;TTC_SERVER_DSN=sampledb_1121;
UID=odtest;DATASTORE=C:\app\oracle\product\TimesTen\TT1121~1\DEMODA~1\sampledb_1121;DATAB
ASECHARACTERSET=WE8MSWIN1252;CONNECTIONCHARACTERSET=US7ASCII;PERMSIZE=40;TEMPSIZE=32;TYPE
MODE=0;
(Default setting AutoCommit=1)
Command>

Thanks eric. Quite useful for me
Worked great! Was having problems until I found this article.
Thanks a lot!
Please submit, Creating an ODBC Client DSN for an Oracle TimesTen Database in Linux environment.